


How to Remove Car Seats for Detailing (Or Skip It)
Most of the time, you don't need to remove your car seats for a thorough interior detail. Professional-grade equipment — the kind mobile detailers actually use — can reach every problem area without touching a single bolt.
That said, there are specific situations where removal makes sense, and knowing the difference saves you time, money, and a potential headache with your car's electrical system.
After detailing over 2,000 vehicles across San Diego County, here's what we've actually found.
When Car Seat Removal Is (and Isn't) Necessary
The idea that seats have to come out for a real clean is outdated. It made sense before commercial extraction equipment, high-pressure steam systems, and purpose-built attachments existed. Today, the limiting factor isn't access — it's the quality of tools and technique being used.
How to Remove Car Seats for Cleaning — And Why Most People Don't Need To
A customer recently brought us their Toyota Corolla and asked us to pull the seats before we started. Their concern was the buildup between the seat rails and along the edges of the carpet where a standard vacuum can't reach. Completely valid concern.
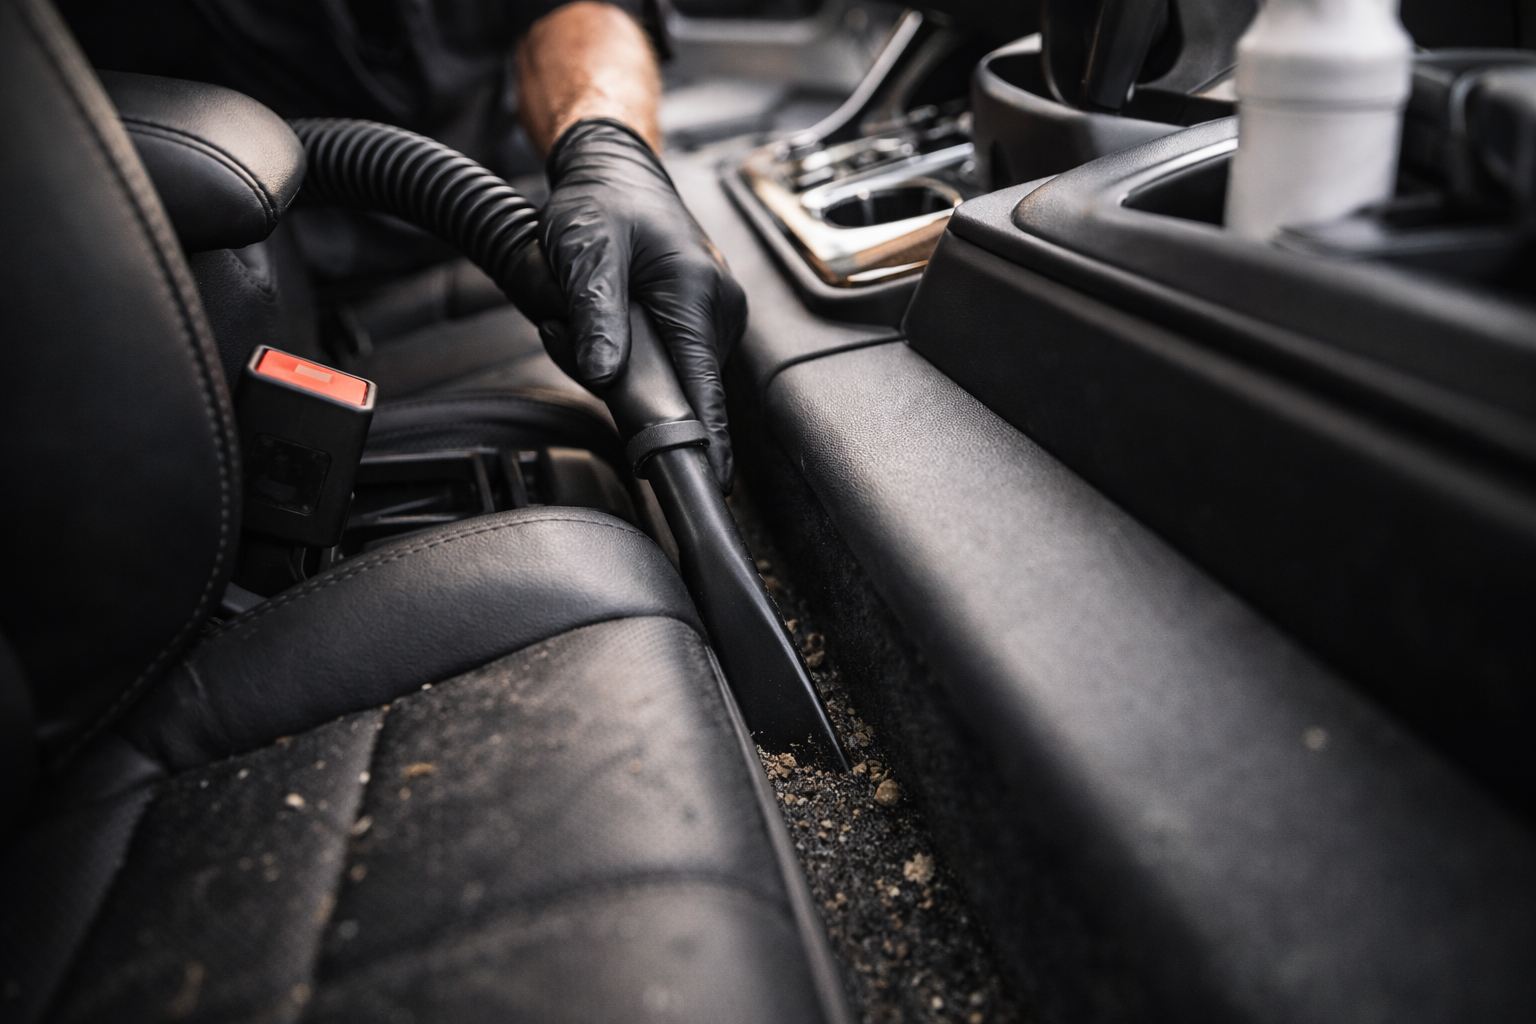
Instead of removing anything, we ran compressed air at 150 PSI through the seat tracks to dislodge the packed debris, followed it with a long-nozzle vacuum attachment that fit directly into the channels, then finished with a steam pass to sanitize and lift any remaining residue. The result was cleaner than if we'd removed the seats, and the whole process took less time with zero safety risk.
That's the case for about 90% of the interior details we do.
What Professional Equipment Actually Does That a Shop-Vac Can't
Compressed air at 150+ PSI dislodges debris from seat tracks, carpet fibers, and tight channels that vacuum attachments can't reach on their own. This is especially useful in San Diego where fine beach sand from Pacific Beach or Mission Bay works its way into every corner of a car interior after a few trips.
The pressure is calibrated to be aggressive enough to move compacted debris without damaging fabric, leather, or plastic trim — it takes practice to use correctly, which is part of why the results differ from what you get with a handheld blower from the hardware store.
High-powered extraction equipment pulls moisture and contaminants from deep within upholstery and carpet backing — not just the surface layer. The difference between a shop-vac and commercial extraction is the combination of suction strength and heat, which together pull contamination from the padding itself, not just the fibers sitting on top.
Why Steam Cleaning Makes Seat Removal Unnecessary in Most Cases
Steam cleaning with precision attachments handles bacteria, organic stains, spilled drinks, food residue, and pet accidents at the source. Narrow nozzles and angled extension wands reach along carpet edges, around seat mounting points, and into ventilation channels where most of the real contamination accumulates.
The operating temperature is high enough to kill bacteria and break down organic material that resists chemical treatment alone. For San Diego families dealing with sunscreen residue, dog odor, or the aftermath of a travel soccer season, steam is often what makes the difference between a car that smells clean and one that just looks clean.
The bottom line: if your main concern is thorough cleaning and you're not dealing with flood damage or severe structural contamination, professional equipment delivers better results than seat removal in almost every case.
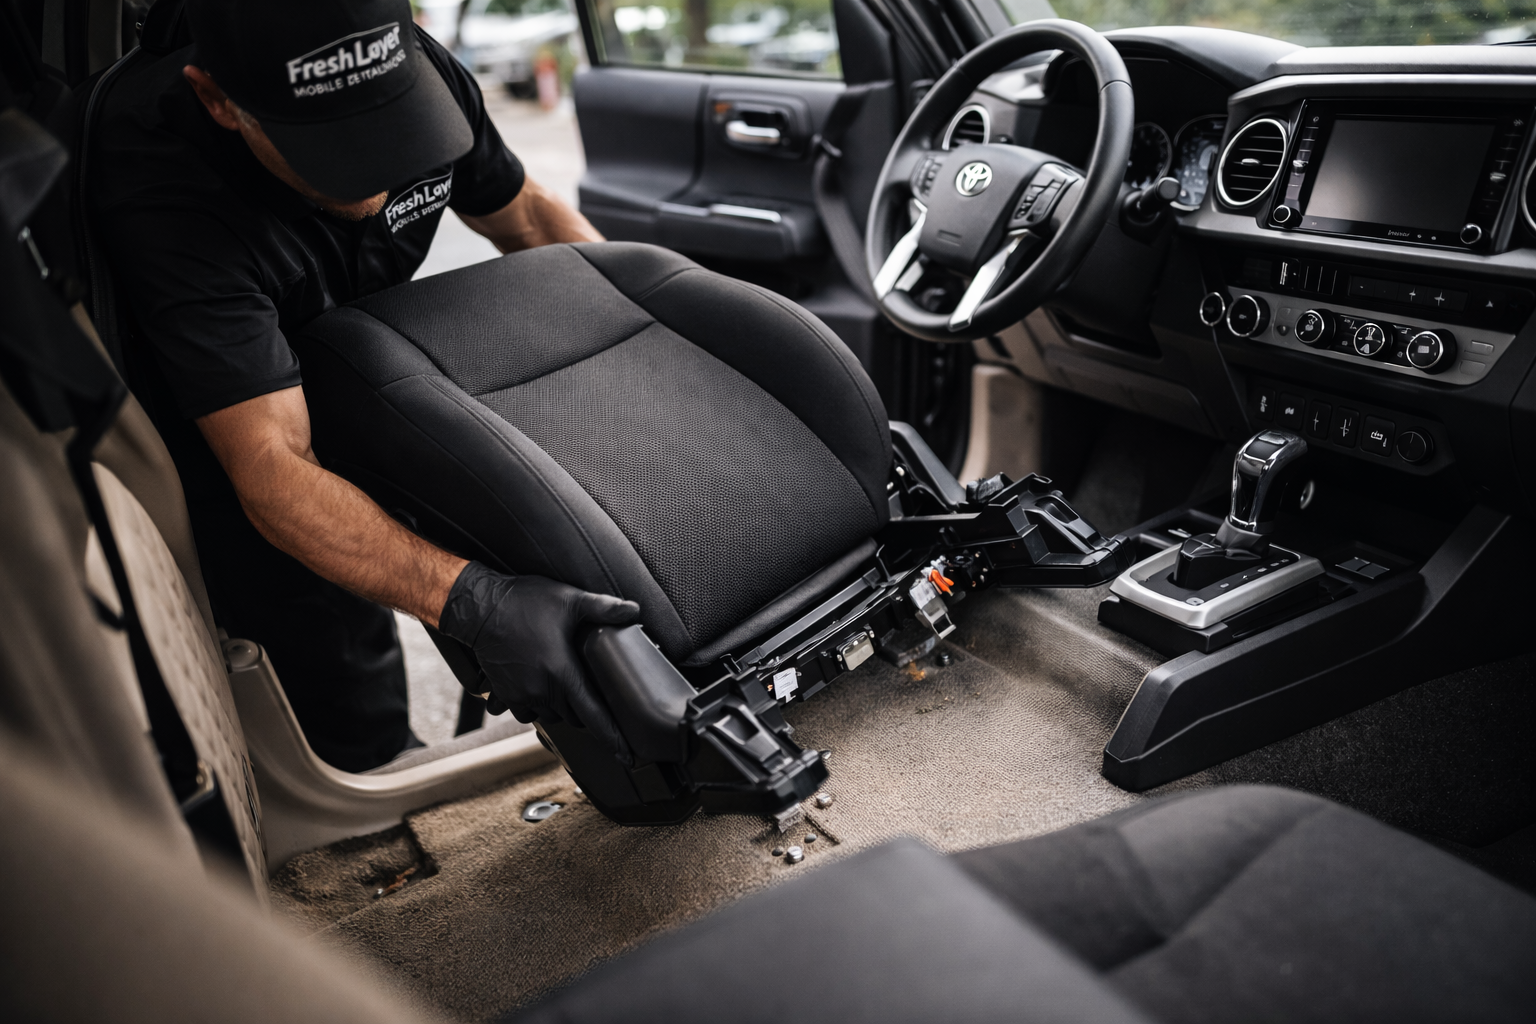
When You Actually Need to Remove Car Seats
Despite having equipment that handles most situations, there are legitimate cases where Fresh Layer recommends seat removal before work begins.
Flood Damage and Significant Water Intrusion
If water has soaked into the insulation and padding underneath the seats, you need physical access to assess and treat those materials. You can't properly dry or remediate padding with seats in place, and trapped moisture underneath seating is a real mold and odor hazard.
We see flood-affected vehicles come through San Diego more often than people expect — many are purchased from out of state and the water damage isn't fully apparent until the interior starts developing an odor months later. This is one case where removal is the right call, full stop.
Severe Contamination That's Had Time to Set
We've worked on vehicles where previous owners smoked heavily for over a decade. That level of contamination saturates sound deadening material and floor pan insulation — surfaces you simply cannot reach without removing the seats.
In these cases, working around the problem wastes time and produces incomplete results. The smell comes back within weeks because the source was never actually treated. When contamination has reached that depth, direct access is the only real solution.
Persistent Odors That Won't Respond to Surface Treatment
Some contamination — particularly from spills that sat untreated for months — soaks through multiple material layers into carpet backing and padding.
When professional treatment of the surface and upper padding doesn't resolve the odor, direct access to backing materials is the next step. This is not a common situation, but when it's the right call, trying to work around it just delays and increases the eventual cost of the job.
Upholstery Replacement and Carpet Repair
If you're replacing carpet, repairing seat mounting brackets, or accessing wiring under the floor pan, the seats come out regardless.
That's repair work rather than detailing, but the process overlaps enough that people sometimes combine both into one appointment when the car is already partially disassembled.
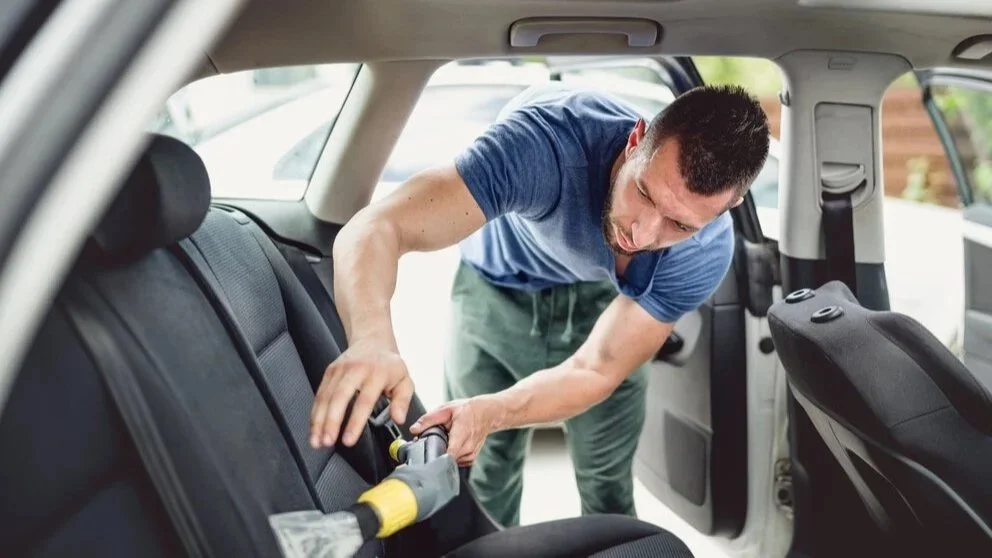
How to Remove Car Seats Safely (If You're Going the DIY Route)
If your situation is one of the legitimate removal cases above and you're handling it yourself, the process is straightforward but not forgiving of shortcuts.
What Tools You Need to Take Out Car Seats
A socket wrench set in the correct sizes for your vehicle (check your service manual — this varies by make and model), flathead and Phillips screwdrivers for trim clips and covers, pliers for connector housing clips, a torque wrench for reinstallation, labeled bags or containers for all hardware, and a marker to tag electrical connectors before you disconnect them.
Taking photos of the wiring and connector positions before you start is genuinely useful — it sounds obvious but most people skip it and then spend time figuring out which connector goes where during reassembly.
Removing Car Seats With Airbags — The Battery Step You Can't Skip
Modern seats contain airbag components, side-impact sensors, and occupancy detection systems. Disconnect the negative battery terminal and wait at least 15 minutes before touching any seat wiring. This isn't overcautious — it's the step people skip and regret.
Capacitors in airbag systems retain charge after the battery is disconnected, which is why the wait matters. Triggering an airbag during seat removal causes injury, destroys the airbag module, and creates an expensive repair bill that dwarfs whatever you were trying to save by doing this yourself.
Step-by-Step: How to Take Seats Out of a Car
Park on level ground and engage the parking brake.
Locate the four mounting bolts at the base of the seat — one at each corner.
Remove them and store them in a labeled bag so they don't get mixed up with hardware from another seat.
Before lifting the seat, disconnect all electrical connectors.
Each one has a locking tab or sliding release mechanism.
Never pull hard on a connector that isn't releasing — you're missing the release mechanism, and forcing it breaks the plastic housing, which in some cases means replacing the full harness.
With connectors disconnected and bolts out, tilt the seat to create clearance and carefully lift it out.
Front seats are heavier than most people expect — getting a second person involved is worth it. Move the seat slowly to avoid catching it on door trim or sill plates.
Reinstalling Car Seats — Where Most Mistakes Happen
Position the seat so the mounting holes align without forcing. If you're fighting the bolt to get it started, the seat isn't in the right position.
Reconnect all electrical connections before fully bolting the seat down — you have more flexibility to confirm each connector is properly seated when the seat still has a little play.
Each connector should click or lock firmly into place.
Hand-tighten all four bolts first to confirm alignment, then torque to specification.
For most passenger vehicles, seat mounting bolts require 30–40 ft-lbs.
Under-torqued bolts allow movement during a collision; over-torqued bolts strip the floor pan threads, which turns into a much more expensive repair than the job you were originally trying to do.
Reconnect the battery, start the engine, and test every seat function — power adjustment, heating elements, lumbar support, memory settings. Check the dashboard for any warning lights, particularly airbag system indicators. If a warning light is on, you have a loose or damaged connector that needs to be resolved before the vehicle is driven anywhere.
Liability Concerns and Risks
Removing car seats can pose several risks:
Airbag Systems: Incorrect handling of electrical connectors can trigger airbags, posing a safety risk and potentially causing injury.
Electrical Damage: Improper disconnection or reconnection of electrical components can lead to malfunctions, affecting seat heaters, sensors, and other systems.
Warranty Issues: Unauthorized removal of seats could void certain aspects of your vehicle’s warranty, particularly if not done according to manufacturer guidelines.
Do Car Detailers Remove Seats?

This question comes up constantly, so it's worth a direct answer.
Why Most Professional Detailers Don't Remove Seats as Standard Practice
Most professional detailers don't remove seats by default, and the reason is practical. Beyond the time cost, there's real liability attached to working on components connected to airbag systems.
If something goes wrong during reassembly — a connector seated improperly, a bolt under-torqued, a warning light triggered — that becomes a dispute between the customer and the detailer over who's responsible for a safety-related repair. That's a conversation nobody wants to have.
How Fresh Layer Handles Seat Removal Requests
At Fresh Layer, we don't remove seats unless the situation clearly calls for it.
Our equipment handles the cleaning outcomes customers are actually looking for without creating any of those risks.
For the Toyota Corolla customer who asked us to pull the seats — the result from compressed air, long-nozzle extraction, and steam was cleaner than seat removal would have produced, and the whole conversation took about 30 seconds.
If you're comparing mobile detailers prices in San Diego and one immediately agrees to remove your seats without asking what specific problem you're trying to solve, that's worth a follow-up question. Either they haven't thought through the liability, or they're adding complexity to justify a higher price. Neither is a great sign.
Our mobile detailing services are built around getting real results without unnecessary disassembly. The equipment we carry exists specifically so that seat removal stays the exception rather than the default.
The Real Cost of DIY Seat Removal

If you're weighing doing this yourself against calling a professional, the math is worth running honestly.
Time, Tools, and What Can Go Wrong
Time investment for a first-timer runs 2–4 hours — roughly 30–60 minutes per seat including prep, removal, cleaning, and reinstallation. That's assuming nothing goes wrong. If a bolt is seized, a connector breaks, or you get a warning light during reassembly, add several more hours and potentially a dealership visit on top of that.
Tool costs add up quickly if you don't already own them. A quality socket set, specialty extensions for tight spaces, and a torque wrench run $80–150 if you're buying everything new. The torque wrench alone is $30–60, and it's the tool most people try to skip — which is also the one that creates safety problems when they do.
When Professional Mobile Detailing Makes More Sense
If something goes wrong during DIY removal, the repair costs escalate fast. Electrical system diagnosis at a dealership starts around $150 just for the inspection.
Replacing a damaged connector or harness section adds more on top of that. An accidentally deployed airbag is a four-figure repair. Stripped floor pan threads require helicoil repair or panel replacement depending on severity.
Compare that to professional interior detailing in San Diego starting at $249 — thorough results, no liability, no tool investment, no weekend on your hands and knees. We also handle how to clean under car seats without removing them, which for most vehicles is exactly the outcome you're after anyway. For most people running the numbers honestly, the choice isn't close.
FAQs About Car Seats Removing
-
Yes, and don't skip the waiting period. Disconnect the negative terminal and wait at least 15 minutes before handling any seat wiring. Modern seats are connected to airbag and sensor systems that can activate from static discharge or accidental contact. The wait time lets capacitors in the airbag system discharge fully. This step takes 15 minutes and prevents potentially serious injury — it is not optional.
-
For most vehicles, yes — but it requires the right tools, patience with electrical connectors, and a torque wrench for reinstallation. The step most people skip is proper torque on the mounting bolts. Too loose and the seat can shift in a collision; too tight and you strip the floor pan threads. If you're not comfortable with either of those risks, or if your vehicle has a more complex seat system with additional safety components, have a professional handle it.
-
It can. Unauthorized removal that results in damage to electrical components or airbag systems may fall outside your factory warranty coverage. If your vehicle is newer and still under warranty, check with your dealership before doing this work yourself. The answer varies by manufacturer and by what specifically went wrong during the process.
-
At minimum: a socket wrench set in the correct sizes for your vehicle, flathead and Phillips screwdrivers, pliers for connector clips, labeled bags for hardware, and a torque wrench for reinstallation. The torque wrench is the tool most people don't own and try to skip. It's worth the $30 — under-torqued seat mounting bolts are a safety issue, not just a loose rattle you'll hear on the freeway.
-
Start with compressed air at high pressure to dislodge debris from seat tracks and tight channels. Follow with a vacuum using a long flat nozzle or crevice tool to pull everything out. For stuck-on contamination or staining, a steam cleaner with a narrow attachment covers what the vacuum leaves behind. This is the exact process we use on every interior detail — it reaches everything short of water-damaged padding underneath the carpet itself.
-
Fresh Layer's interior detailing starts at $249. Final pricing depends on vehicle size and condition — a compact sedan in reasonable shape is priced differently than a three-row SUV that hasn't been properly cleaned in two years. You can book online and same-day appointments are available when slots are open.
How Fresh Layer Handles Interior Detailing in San Diego
Joe had his 2021 Tesla Model Y detailed after a full season of tailgating at Aztec games. A year of grass, dirt, and general stadium wear had worked into every corner of the interior. Joel from our team arrived on time — called 30 minutes ahead to confirm — and worked through the full interior process. Joe's words: "The inside looks brand new! He got all the dead grass and dirt out... EXCELLENT JOB!! Price was fair and is listed on their website." Same-day appointment, booked online.
That's a normal Fresh Layer job. Here's what the process looks like from start to finish.
What Happens During a Professional Interior Detail
Assessment (5–10 minutes). We walk through the vehicle, identify problem areas, note any pre-existing damage, and explain exactly what we'll do. No surprises mid-job and no upsells you didn't ask for.
Compressed air treatment. We clear dry debris from seat tracks, vent channels, door jambs, and every crevice before introducing any moisture. This step is what separates a real detail from a glorified vacuum job — and it's also what handles the cleaning-under-seats problem that most people assume requires removal.
Hot water extraction. Commercial equipment pulls contamination from carpet and upholstery at depth. We're cleaning the padding, not just the surface fibers sitting on top of it.
Steam sanitization. High-temperature steam addresses bacteria, allergens, and organic staining throughout the interior. It's also the most effective treatment for odors with a biological source — pet accidents, mildew, food that sat too long.
Protective treatments. Leather conditioning, fabric protection, and surface dressings finish the job and slow the rate at which the interior accumulates damage again. In San Diego's UV environment, skipping this step means the results start reversing faster than they need to.
Serving All of San Diego County — We Come to You
Total job time is 2–4 hours depending on vehicle size and condition. You stay home, get work done, or run errands. We let you know when we're finished.
We cover all of San Diego County — La Jolla, Pacific Beach, North Park, Mission Hills, Hillcrest, Chula Vista, El Cajon, Santee, Oceanside, Escondido, Alpine, and everywhere in between. No shop drop-off, no waiting room, no giving up your car for the day.
Book an interior detail online or call us directly at (619) 874-4115. Same-day appointments are available when slots are open.


